Editing Case Notes and Viewing Note History
The history of a given note includes the original note content, as well as any edits that have been added to the note.
Note history can be reviewed by all providers but the content of the original note can never be deleted or altered.
Note edits can only be made by the original author of the note. To comment on a note that you did not write, you need to create a new note associated with the same issue as the note you are commenting on.
All signed and saved notes that you have authored are shown with a pen-and-pencil icon ![]() beside them. Notes authored by providers other than yourself do not have this icon and cannot be edited by you.
beside them. Notes authored by providers other than yourself do not have this icon and cannot be edited by you.
1. Open Case Management Encounter window of the client whose note you want to edit, and scroll down to the Progress Note Report View:
2. Click the pen-and-pencil icon ![]() beside the note you want to edit to open the Issue Association and Progress Note Report View window, which displays the issues selected that are associated with your note, as well as the content of the note you wrote, similar to the graphic below:
beside the note you want to edit to open the Issue Association and Progress Note Report View window, which displays the issues selected that are associated with your note, as well as the content of the note you wrote, similar to the graphic below:

3. In the Progresss Note Entry View text box, type the changes you want to make to the note.
4. At the bottom of the window, click the Sign check box, and the click the Save and Exit button. The window closes, the updated note is displayed in the Progress Note Report View list, with a clock icon ![]() beside the pen-and-pencil icon.
beside the pen-and-pencil icon.
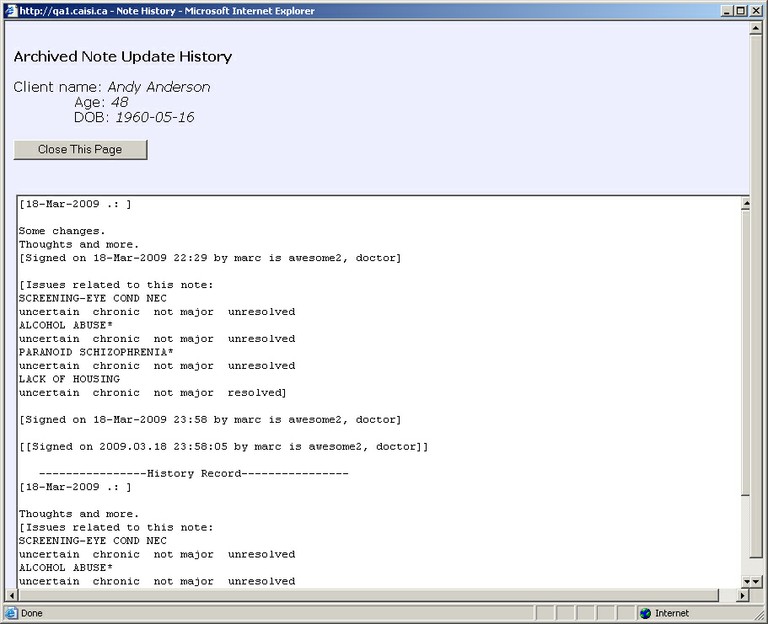
Note: If you want to view the history of your note, click the the clock icon ![]() beside the note. The Archived Note Update History window opens, showing the changes that have been made to the note:
beside the note. The Archived Note Update History window opens, showing the changes that have been made to the note:

Document Actions

