2.2.4 Writing Prescriptions with Rx3
NOTE: Rx3 has to be installed and activated in oscar.properties
STEP 1- SEARCH FOR DRUG
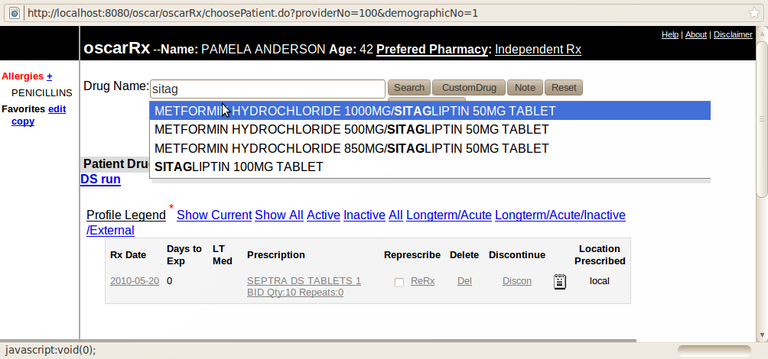
- In the box beside ‘Drug Name’ type in the name of the
drug you want to prescribe. After a few letters the appropriate choices appear in a drop down list

- Click
on the SEARCH button if you want selections of brand and trade names as well as drug classes to choose from.
- For prescription recommendations for certain diagnoses, click the ‘Drug of Choice’ link to the right of the box.
STEP 2- WRITE THE PRESCRIPTION
- The writing area will expand to give you a space to fill in the instructions quantity and repeats for the medication
- Click off the Long Term Med check box as appropriate
- You can add more drugs by adding into the new search area provided (Drug Name:) or proceed to printing

STEP 3- PRINT THE PRESCRIPTION
- The final screen brings up selections to actually print the prescription.

- If you or your patient forgot something you can click on Edit to return to the previous screen.
- Click ‘Print’. If you wish for a record of the prescription to appear in you Encounter notes, click ‘Print & Paste into EMR’
- Your prescription is at the printer, ready for your signature!
Custom Drugs
If you can’t find the drug you are looking for, you can create a custom drug prescription. This can be done by clicking on the custom drug button.
Warning: Only use this feature if absolutely necessary, as you will lost the following functionality:
- known dosage forms/ routes
- drug allergy information
- drug-drug interaction information
- drug information
Fill out the drug, dosage and instructions as you would for a normal prescription.
Allergies
If you write an Rx for something that the patient has a listed allergy, you will be informed at the drug selection stage. For example if you wanted to write Clavulin(R) for someone who is listed as being allergic to Penicillins then the flag will come up in Red. This is not a substitute for one's professional obligation to independently review allergies, nor will the program prevent you from printing the prescription if that is what you feel is the clinically most appropriate course.
Add Special Instruction
After you searched and selected a
drug, when you click on "Instruction" in the prescription box , a text
box for typing special instruction will blind down. If you click on
"Instruction" again, the text box will blind up. A quicker way to invoke
special instruction text box is to press the "Enter " key when you
finished typing in the "Instruction" text box.While you are typing, a
list of known special instructions are displayed for user to choose.
Re prescribe all long term drugs at once
Click on "Represcribe Long Term Meds" on the search page, all long term drugs will appear.
Discontinue a drug
Click on "Discon" on the right of a drug name.
Select the reason for discontinuing the drug and add any comment if needed.
Difference between an empty note and a written note to a prescription
By clicking on  ,a user can write and save a note to a prescription.
When the page is loaded next time,
 shows up to help user remember which prescription has
been noted.
Information on different profile views
Adding a favorite drug
Search and select a drug.
Click on "more" after a prescription box appears.
Click on "Add to Favorite" and type a name for your favorite drug.
Adding an allergy
Click on "+" sign beside "Allergies" in the left side bar.
Add an allergy in the same way as the old prescription module.
Generating multiple-page PDF prescription document in different page sizes
After a prescription is made by clicking the "Save & Prescribe" button, a preview window will appear.
You can choose to generate either A4 or A6 size pdf for your prescription.
Click on "Print PDF" to download the generated prescription pdf file.
Setting personal preferences
- Set default quantity of prescription.
- Click on "Set Default Quantity" link at top of the page. A small
window pops up which allows you to modify default quantity.
- Enter your desired quantity and click "Save" button and close the
window. Next time when you make a new prescription of a drug which was
not used by the patient before, the default quantity will appear in the
"Quantity" text box in the prescription table.
- Set default size of prescription PDF document.
- In patient appointment screen, click "Pref" link which is in the top bar. A small window pops up which allows you to set preferences for several things.
- Click on "Set Rx Script Page Size" link and a window with a drop-down list will pop up.
- Select the size you desire and click "Save" button and close the
window. This size will be chosen automatically before you generate the
PDF document next time.
- Set different drug profile for viewing
- In the search drug page, click on "Change View " link, a window with multiple check boxes will pop up.
- Check the display options which you want to view for drug profile and click "Save".
- Set to use Rx3 by an individual provider
- In patient appointment screen, click "Pref" link which is in the top bar. A small window pops up which allows you to set preferences for several things.
- Click on "Set to use RX3" link
- Select checkbox if you want to use RX3, unselect if you don't
Document Actions

