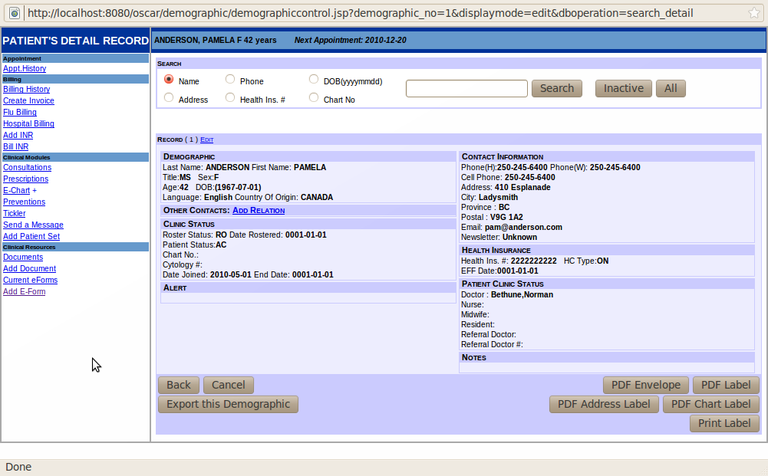
1.3.3 Working with Patient Detail Records
Patient Detail Record

Other than using the Search Tab, Master Demographic Records are accessible on the Appointment Screen by clicking the ‘M’ or by clicking the word MASTER on the navigating bar to the left of the E-Chart.
SEARCH FUNCTION
Across the top of the window you can still access another patient’s record directly from this screen in the same way you search for a patient when in the SEARCH tab.
Type in part of the patient’s last name, add a comma and the first initial of the given name to bring up a list of patients to choose from. You can search by name, phone, address, health number or chart number in the same way.
EDITING A PATIENT’S RECORD
Click ‘Edit’ at the top of the patient’s record to correct, add or delete information to his/her record.

Search #
To allow for autopopulation of consult letters with the Referral Doctor you need to link Referral Doctor's particulars with the Patient

- Click on the Search #
- Search then by Name, Specialty or Referal No by placing some of that information in the search box. In this case 'Osle' under name
- When the Search is done all the entries that meet your search are displayed. Just click on your referal doctor and the patient will be linked to that physician.
- If you want to Add or Edit a Referral Doctor press the link

- You have to first enter a 6 digit number to see if the Physician exists in the database
- If not you can Add an entry with that number
- If they exist you can edit the entry
- Save
Swipe Card
Clicking on the ‘Card Swipe’ button will bring up a small window. Swipe the patient’s health card through the card swipe equipment and the information from the magnetic strip with download to the window. Compare the information on the Master Demographic Record and update the information, if appropriate. The Posh MX5 USB is a reliable magnetic stripe reader used in several Oscar offices built by a company in Surray BC. Other stripe readers also work well.
Out-Of-Province Patients - (how to enter HIN#)
- In ‘Patient Detail Record’ enter the out-of-province health number in the HIN box
- In ‘HC Type’ click on the the drop down menu of the provinces & select the correct province
NOTE: There is a Reciprocal Health billing agreement with all provinces except Quebec. Quebec patients need to pay cash for the appointment and submit the receipt to the Quebec Health system for re-imbursement.
Alert & Notes Areas
Anything typed in the Alert box will show up in bright yellow in the ‘Make Appointment’ window to alert the receptionist during appointment booking. The notes area can be used for various functions from keeping track of family members to reminders of re-booking dates for tests.
ADD A RELATION
This feature can be used when the patient has relatives that are also patients at the clinic and already have active medical files in OSCAR.
- Click the “ADD RELATION” link next to OTHER CONTACTS in the main patient detail record screen.
- A table of the patients already labeled as relations appears below a Search field. You can delete any incorrect relative contacts, or search for new relatives.
- After entering a relative’s last name and clicking ‘Search’, a list of possible matches will appear. Select the ID number of the correct patient.
- Choose the type of relationship that this person has with your original patient. You can also mark him/her as the patient’s substitute decision maker or emergency contact.
- Click ‘Add Relationship’. The next time you bring up the patient’s detail record, the person you just added will appear under the heading OTHER CONTACTS.
PDF LABEL
The ‘PDF Label’ button pulls up a pdf version of the patient’s label.
PRINT LABEL
The ‘Print Label’ button allows you to print any number of the 5 types of labels for the patient’s files, laboratory requisitions or mailing labels.
- Place a check box and enter the quantity for any of the types of labels you wish to print, and click ‘Copy to Clipboard’.
- Clicking “New Patient Label” will automatically enter in the number of labels that a new patient in your clinic needs for their file.
- The location of the text and the size of the label can be adjusted using the text boxes under the heading “Location”.
- Click ‘Print Preview/Print’ when you are ready to print the labels, then click “Print”.
Document Actions

