2.6.1 Adding eDocuments
There are three places where you can add documents into OSCAR.
- Upload a document via the eDoc tab. These will be files for your personal use or documents such as contact lists that the whole office can use.
- The second area is to attach files to the patient’s electronic medical file
- The third is through batch upload in the Inbox
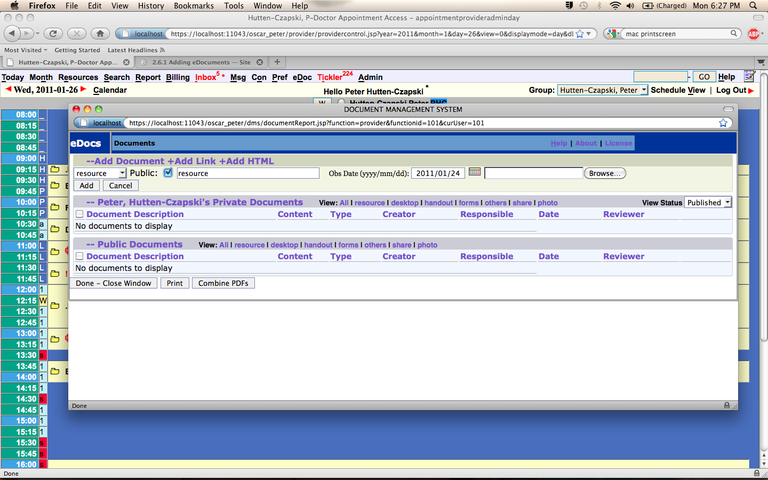
ADD A DOCUMENT

- TO THE eDocs TAB: Click on the ‘eDoc tab’ and click
‘ADD DOCUMENT’ in right corner
TO A PATIENT’s e-Chart: Click on the ‘documents’ link on the bottom left side of the e-Chart screen. Click ‘ADD DOCUMENT’ in the upper right corner. - Document Type: select
the type of file you are going to upload (eg resource in the example)
NOTE: If you put ‘PUBLIC’ everyone in your office will have access to this file. This option is great for contact lists and schedules. If you select any of the other types of documents, the program will sort the documents into either resource, desktop, handout or forms in your eDoc tab. These documents will only be accessible when you log into OSCAR and not for the general office. Others will not see these documents in the eDoc tab when they log in.
Document Description: Type a short descriptive name for the file (users will see this name in your eDoc window)
Date: is put in automatically, but you can put in another date if more appropriate
Creator: is put in automatically - Click "Upload file" beside the File Name box
- Click the ‘Browse’ button to search for your file on your hard drive
- Click on ‘Upload’ once you have selected your file
- When you are back at the “Add Document” screen click on “SUBMIT” to add the file
For the PATIENT's e-Chart the screen is slightly different and has different document types
Below is the example for adding a "consult" type document
For this type of document the Observation date is more useful than the current date
Put in the date the consult was done rather than when the document was added

MANAGEMENT TIPS
For documents that need to be scanned: scan documents first into a local folder with a short name. Then upload each scanned document giving more explanatory names in the ‘Display Name'
Best text files to add: PDF (Acrobat file), RTF (Rich Text Format) or html file.
Best type of picture file: JPG - GIF - BMP - PNG or TIF
MIGRATION TO ELECTRONIC FORMS & NOTES
Doctors who wish to start migrating towards a paperless office have often done so in the summer time. Lower cost staffing is possible at this time of year, since students are available to scan paper charts into PDF files and upload them into the patient’s electronic medical records.
- Small handwritten records on scraps of paper in the file, like home visits or nursing home visits, are typed in as an encounter note, date of the note entered and then “Sign, Save & Exit”.
- The “Reason” field, which will automatically come up as ‘Tel-Progress Note’ should be changed to the type of document required (e.g. ER visit on 2001/10/2).
- The actual encounter note will simply be a short summary (e.g. otitis media, Rx Amoxil 250 TID / 10 days)
- File the papers with the scanned documents in an archived box, in chronological order and keep for legal purposes for the requird 10 years. DONE!
- This is actually more readable than even scanning in and appears directly on the progress note section for easy reading. You will find that less paper needs to be scanned in, and reading the chart is much faster.
Document Actions

