1.7.1 oscarMessenger
ACCESS
- From the appointment screen: click the “Msg” tab
- From the Main Demographic Record: click the “Send a Message” link
- From
the Encounter screen:
- Classic Interface: click the “Send Msg” link to send messages, and “All Messages" to view messages linked to the patient
- Case management Interface: click on the Oscar Msg + to send messages or on any of the displayed messages
- From the "Admin" tab click on "Messages"
- From the "Inbox" tab when reviewing a lab or document clicking on the "Msg" button

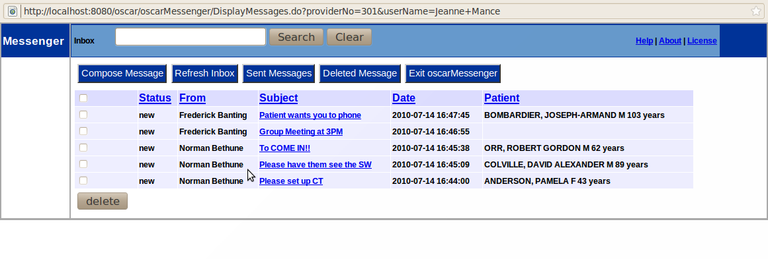
READING MESSAGES
- Click on a column heading to sort by that criterion
- Click on the Subject title to display your message
- Note across the bottom of the screen the functions you can do with this message (Reply / Reply All / Forward / Delete)
- Note across the top that you can still navigate to the following within the message views (Compose Message / Back to Inbox / Exit OSCARmessenger)

REPLY, FORWARD OR DELETE A MESSAGE
Across the top of the message screen are the buttons to reply, reply all, forward or delete a message.

- When either the ‘Reply’ or ‘Forward’ button is clicked, the full address book is available for use (the address book names can be edited by any staff who has administrative access to the program)
- Click on the individuals you want to forward the message to
- Enter your reply and the click ‘Send Message’ button
- The next screen tells you that your message has been sent and give you the option to ‘Compose a Message, Print, Back to Inbox or Exit oscarMessenger
SENDING A MESSAGE

- Click ‘Compose Message’
- Type in a subject heading & your message
- If you want to send information about a patient, type their last name in the search field at the bottom of the screen and click ‘Search Demographic’. Click on patient’s number, then on ‘Attach Demographic’ to choose the information you wish to send with your message.
- Select the people, and or groups of people you want to send the message to and click ‘Send Message’
REFRESH INBOX
When you click this button, the program will retrieve any new messages from the server
SENT MESSAGE
Clicking this button with show a list of all the messages you have sent
You can use the ‘Forward’ button if you want to send the message out again to another person.
DELETED MESSAGES
Clicking this button will show you all the messages that you have deleted from your INBOX
You can restore them to the INBOX by clicking the ‘UNDELETE’ button at the bottom of the page
ATTACHMENTS
- To read an attachment, open the message by clicking on the link in the ‘Subject’ column
- Click on ‘View Attachments’
- Click on ‘Expand All’ to view all the information or ‘Collapse All’ to minimize the information view
- When you click ‘Expand All’ it will show patient demographic information that another health care professional has sent you
- NOTE: The attachment function is only used to send patient demographic information in a secure format to another health care professional within the clinic or at another OSCAR site.
GROUP ADMIN

- In the Admin tab click on Messenger Group Admin
- The Group Configurator will open at the Root level
- The people that are listed at this level are checked
- You can create groups of people under the Root level (here we have Docs and Team1) by clicking the New Group link
- Click on the members of the group so that you can send them messages and Update (or Delete the group altogether)
Document Actions

