1.4.1 Billing for the Encounter
FOUR WAYS TO ACCESS:
- From the B on the patient appointment screen
- From the 'Create Invoice' link in the ‘Patient’s Detail Record’ window
- CLASSIC INTERFACE From the ‘Billing’ link in the Encounter window, under ‘Clinical Modules’
- CASE-MANAGEMENT INTERFACE From the 'Sign Save and Bill' link icon in the Encounter window at the bottom of the screen
- From the Billing tab, produce an Unbilled Report and you can bill by clicking the link "Bill [$]" under the heading "Comments".
The billing window will appear.
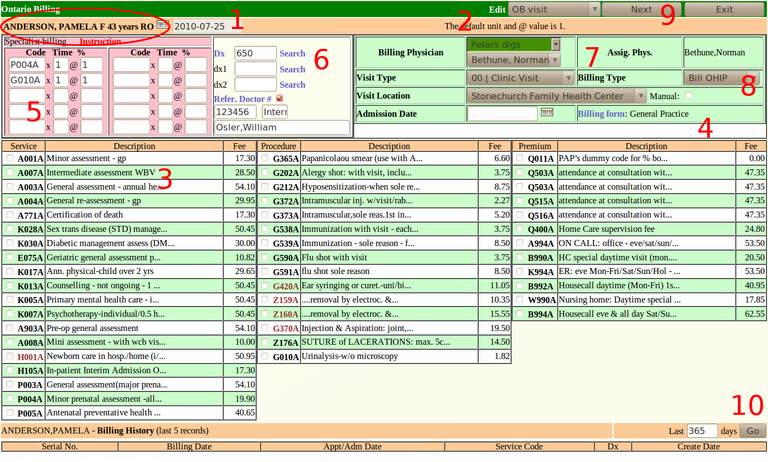
Ontario Billing Screen
Ontario Billing Screen

PATIENTS STATUS AND ROSTER STATUS
- The patients name will appear at the top left
- Patient Status shows whether the patient is active (AC), inactive (IN), deceased (DE), moved (MO), etc.
- Roster Status shows whether the patient is rostered (RO), not rostered (NR), fee for service (FS), terminated (TE), etc.
BILLING SCREEN
- The billing date will default to today. You may alter it with the calendar icon
- Here a 'SUPER CODE' was selected which is a preset combination of billing and diagnostic codes for, in this case, a prenatal visit
- Alternately or in addition you can click off common billing codes from the billing template.
- Your default billing template is listed in your preferences, but you can also access any of them on the system with clicking on the 'Billing Form' link
- Or you can enter them free hand in the top left. You can search by entering part of the description here and double clicking
- The diagnosis will often be prentered here. It will be the last diagnosis you billed, or the code linked to the issue you assigned to the visit or the diagnosis linked to the 'SUPER CODE' you used. You can search by entering part of the diagnosis here and double clicking.
- VISIT TYPE LOCATION The clinic location will be one of those that this clinic uses, and will default to the one of the user. In this example Norman Bethune is usually at Peter's Digs. The last OHIP billing location for this patient will be defaulted, including the admission date for hospital visits, but you can alter that here. The visit location can be changed by an administrator under Add Visit Location.
- BILLING TYPE The billing defaults to OHIP. For other types such as WSIB, 3RD PARTY and DO NOT BILL, as well as BONUS CODES (patient less Q codes) click on the arrow beside the window to select from the drop down menu.
- In this patient the defaults are correct and after clicking the 'SUPER CODE' of OB visit all you have to click is 'Next'
- Some codes can only be billed so frequently, so you can search the billings you have done on this patient.
REFERRAL
You will have a check box beside the Visit Type for Referral Doctor #. Checking it will load the referring doctor from the patient’s Master Demographic area. If there is none there, or its a different referring physician, click on the link to select the correct physician. You can search by Name Specialty or Referal No. Below is the search by name for the keyword 'Osl'. Clicking on the entry will load this Physician as the referring MD.

Alternately you can 'Add/Edit Referral Doctor' with the link provided. Search the code first to ensure you don't already have an entry, or for the existing details to be pulled up.

ASSIGNED PHYSICIAN
This is the physician assigned to the patient in the Master Demographics
BILLING PHYSICIAN
Click on the drop down menu to select a physician's name.
SERVICE, PROCEDURE AND PREMIUM CODES
- Select the checkbox(es) of the codes you wish to bill to your patient
- If a service/procedure/premium is not present and you DO know the code, simply enter it into one of the three boxes under the heading "Other service/procedure/premium codes" and enter the number of units billed.
- If a service/procedure/premium is not present, and you DO NOT know the code: use the code search on the lower right corner of the screen to bill up to three additional codes, then enter the number of units billed.
DIAGNOSTIC CODES
- Click on the link labelled "Diagnostic" to view a list of common diagnostic codes, and choose the appropriate diagnosis
- OR you can do a diagnostic code search in the box below:
DIAGNOSTIC CODE SEARCH
This search engine accepts both diagnostic code numbers and text
- If you know the numeric diagnostic code, type it in the box and click the dx code search button to retrieve it from the data base
- Using text in the diagnostic search engine, type part of the diagnostic word in the box and click SEARCH (using only part of the word will give you a longer list)
- If there is only one match, it will put the diagnosis in the box, if there is more that one match, the program will give you a list from which to select
- Clicking on the number link of the desired diagnostic code will insert it into the bill
SENDING THE BILL

- Once you have made all your selections, click the CONTINUE button to view what you have billed
- This gives you the opportunity to go BACK TO EDIT the bill if you forgot something, SAVE the bill as correct, or SAVE & ADD ANOTHER BILL
- Billing Notes can contain any text and will auto-populate with the name of the billing site (if configured for multisites)
- You may take this time to add to the patients Diagnosis List from the Quick List named 'Chronic Diseases' by checking an illness and ADD TO DISEASE REGISTRY
- Click SAVE to save the billing record for processing and bring you back to the appointment screen
Document Actions

