1.6.9 E-Forms
Link to additional information on creating/loading and using e-forms in a patient's chart.
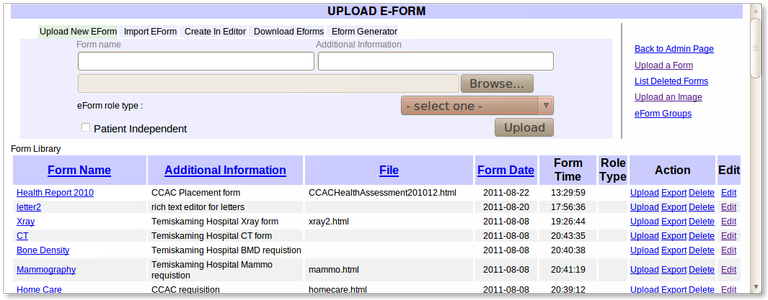
UPLOAD A FORM
Type in a form name and subject description, then click "Browse" to
find the e-form you wish to add. Click "Upload" to add the form to the
directory.
IMPORT AN EFORM
Similar to uploading a form but more efficient as it imports a form and its associated graphics file in one go in a zip format.
CREATE AN EFORM
Creates an eForm from scratch. For advanced users knowledgeable in HTML forms. Most users will only use this page to enter the Form name and Additional Information after they have populated the Edit HTML automatically with the eForm Generator. Patient Independent are like regular eForms in that they may draw on patient data, but unlike patient linked eForms they are not stored as part of the patients chart.

DOWNLOAD AN EFORM
Similar to importing a form but gives you a selection of eForms that have been placed in to a central support site.

EFORM GENERATOR
Here you can make an eForm with an image you have uploaded. The instructions are printed on the page. For more information see Creating eForms

UPLOAD AN IMAGE
If you have used images in your eForm, it is important that you also upload them to OSCAR. Click "Browse" to find the images, and "Upload" to add them.

RICH TEXT LETTER
The Rich Text Letter is a special eForm designed for writing correspondence. If it is not enabled at installation you can activate it here ( it is stored as an inactive eForm in the database). Use of the Rich Text Letter is documented here

FORM GROUPS
Organize your e-forms into convenient groups.
Add New Group
Type in the name of the group you wish to create, then click "Add Group."
Certain group names are used by the enhanced antenatal forms so be sure to create and populate them
- Ultrasound
- IPS
Select/View Group
Choose the desired group name from the drop down menu, then click select. You can also delete the selected group by clicking "Delete Group".
Add to Group
To add new forms to a group, first select the group you wish to modify, then choose the form you wish to add from the drop down menu. Click "Add To Group". You can also remove forms from a group by clicking the "Remove From Group" link next to the desired form.
Document Actions

