1.6.9 E-Forms
SUMMARY
There are several ways of adding new eForms into your OSCAR and there are also ways for you to share your eForms with other OSCAR users. The first thing you need to know is that all eForms are made up of a web file (usually called an html file - because it is written in html or hypertext mark up language) with or without one or more image or other type of files.
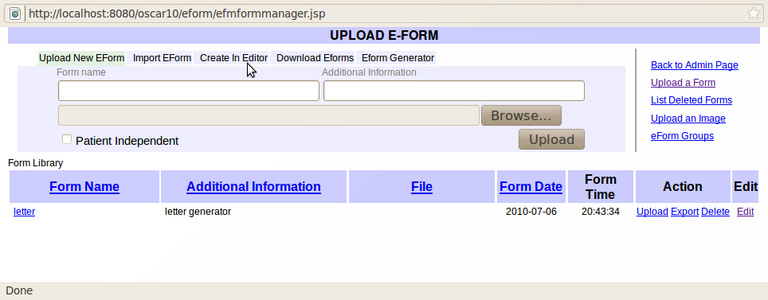
When you add an eForm, you can go to the Admin menu (if you have Admin rights) and choose Upload a Form in the E-Forms section. Alternatively you can click "E-Forms" in the eChart or "Add E-Form" in the Demographic screen (if you have the access rights to these resources). In either case you can then click "Manage eForms" to get to the screen below called UPLOAD A FORM (the term Upload is going to cause a little confusion but hang in there...)
In OSCAR, each eForm is identified by a Form name and Additional information. You must have an unique Form name for each eForm. If you know html and you are writing an html file from scratch you can then click Create in Editor. For most users, you may have most likely obtained an eForm from the oscarcanada.org resource site which is typically made up of the html file and an image file. Use the Browse button to point to the html file which you have downloaded and click Upload. Don't forget to add the image file by clicking Upload an Image after this.
A simpler way to add an eForm is to obtain the "zip" file of the eForm. A zip file is a compressed file containing the html and any additional files plus the Form Name and any Additional Information - all in one package! All you have to click is to click "Import EForm", Browse and find the file and click Import. It's that simple which by the way is just as simple for you to share your eForm by clicking "Export" under the Action column of the list of eForms already in your OSCAR system.
Another way of sharing eForms is via the eForm Emporium! This is still a work in progress so the interface isn't very pretty and you have to be using at least the 9.06 version of OSCAR. You will also need a MyDrugRef ID because the Emporium is located in the same server of the MyDrugRef server. Make sure you had entered your MyDrugRef ID in the Pref section. To share your eForm, you click Upload under the Action column on the eForm in your OSCAR. A zip file will be created and shipped to the Emporium all in one action! Once it is in the Emporium you can click "Download Eforms" to get it.
Link to additional information on creating/loading and using e-forms in a patient's chart.
UPLOAD A FORM
Type in a form name and subject description, then click "Browse" to
find the e-form you wish to add. Click "Upload" to add the form to the
directory.
IMPORT AN EFORM
Similar to uploading a form but more efficient as it imports a form and its associated graphics file in one go in a zip format.
CREATE AN EFORM
Creates an eForm from scratch. For advanced users knowledgeable in HTML forms. Most users will only use this page to enter the Form name and Additional Information after they have populated the Edit HTML automatically with the eForm Generator. Patient Independent are like regular eForms in that they may draw on patient data, but unlike patient linked eForms they are not stored as part of the patients chart.

DOWNLOAD AN EFORM
Similar to importing a form but gives you a selection of eForms that have been placed in to a central support site.

EFORM GENERATOR
Here you can make an eForm with an image you have uploaded. The instructions are printed on the page. For more information see Creating eForms

UPLOAD AN IMAGE
If you have used images in your eForm, it is important that you also upload them to OSCAR. Click "Browse" to find the images, and "Upload" to add them.

FORM GROUPS
Organize your e-forms into convenient groups.
-
- Type in the name of the group you wish to create, then click "Add Group."
-
-
Choose the desired group name from the drop down menu, then click select. You can also delete the selected group by clicking "Delete Group".
-
- To add new forms to a group, first select the group you wish to modify, then choose the form you wish to add from the drop down menu. Click "Add To Group". You can also remove forms from a group by clicking the "Remove From Group" link next to the desired form.
Add New Group
Select/View Group
Add to Group
Document Actions

