1.5.3.11 Demographic Report Tool
This is a powerful reporting tool, that allows you to select the criteria you want from the data base. This function can be used to export ALL of one doctor’s patient data or patient data for 1 patient that can be burned to a memory storage device.
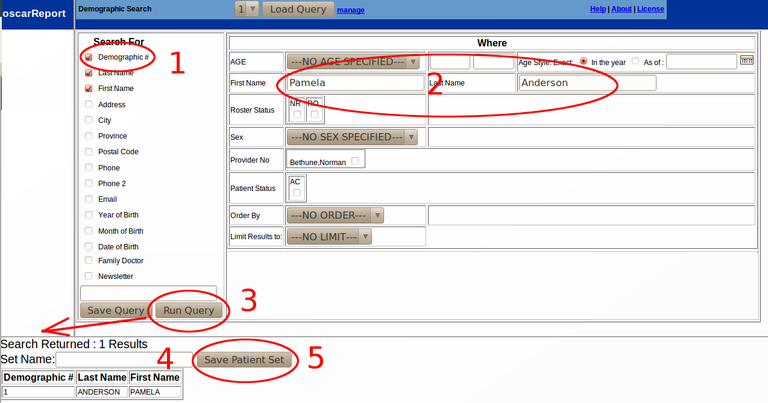
Click ‘Demographic Report Tool’ link in the Report tab to access the following screen:

- Make the desired selections based on the information you want
to see in the report. The checkboxes under “Search For” should be used
to select what information you wish to see in the report, and the
various menus and boxes on the right are used to limit your search. For
example, if you wanted the Year of Birth for every person named Joe, you
would click the checkbox for Year of Birth on the left, and enter “Joe”
into the First Name box on the right. You MUST select at least 'Demographic #' if you want to save the set of patients.
- Under the title ‘WHERE’
you can select the following filters to the report IF NEEDED:
- Age
- you can qualify a specific age or an age range
- First Name/Last Name
- you can export the data for just 1
specific patient by typing their name here (Spelling must be exact to
what is in the Master Demographic file.) In the example illustrated we are searching for Pamela Anderson
- Roster Status
- you can specify here if you want to make a report of all the patients with a specific roster status. Tick off the desired one.
- Sex
- you can specify if you just want to do a report on Male or Female patients.
- Provider #
- This allows you to create a report for just one specific doctor
- Patient Status
- you can select either ACTIVE patients, INACTIVE patients or if you don’t click off any, you will get both active and inactive patients.
- Order by
- This function allows you to set what order you want the patient records displayed in. [first name, last name etc]
- Limit Results to
- allows you to set a limit on how many patient records you want in each report.
- Click ‘RUN QUERY’ (the report will take a little time to run,
depending on the criteria selected) and the results will load on the same page underneath the button
- SAVE QUERY: If you want to save the query set-up with your
selections for the next time you want to run this report, give it a name
in the box above the SAVE QUERY button and click the SAVE QUERY button.
This will then appear in the drop down beside the LOAD QUERY button at
the top of the screen for future use. This is the name used in the Prevention report
- If you have selected at least the 'Demographic #' you will be given the option to enter a name for the Set of patients for use elsewhere.
- To keep the patient list generated by the query, click ‘Save Patient Set’ after supplying the name for the set. This will save the report for the next step to create a file that can be saved to a memory storage device.
- To export a saved patient list
- you must have access to the administration view. See Demographic Export for instructions on how to retrieve your saved lists. If you do not have permission to access the administration view (i.e. you don't have a blue Admin tab on your appointment screen), you must ask someone with admin access to either export the lists for you, or to assign you an admin role.
- To save, modify
and/or print a saved patient list
- select Demographic Set Edit from the list of reports in the Report Tab.
Document Actions

